sass(scss)の&と変数を利用して親の親であるセレクタを参照する
sass の &(アンパサンド) はとっても便利。
特に BEM やるときは、いちいち block や element を書かずに & で書き足していけばいいのでやりやすい。
例えば以下のようなコードをコンパイルすると
.block{
  display: block;
  &__element{
    display: inline-block;
    &--modifier{
      color: #f00;
    }
  }
}
こうなる。
.block{display:block}
.block__element{display:inline-block}
.block__element--modifier{color:red}
んだけど、BEM かつシングルクラス設計にすると、例えば modifier に block や element 要素のスタイルを @extend したい。
例えばさっきのコードだったら、
.block{display:block}
.block__element{display:inline-block}
.block__element--modifier{display:inline-block,color:red}
となってほしかったりする。
そういうとき、以下みたいにセレクタの名前をいちいち調べて @extend するのはちょっとスマートじゃない。
.block{
  display: block;
  &__element{
    display: inline-block;
    &--modifier{
      @extend .block__element;
      color: #f00;
    }
  }
}
&でうまいことやれないかなと思うけど、&は親の名前なので、以下のようなコードだと意味不明になってしまう。
.block{
  display: block;
  &__element{
    display: inline-block;
    &--modifier{
      @extend #{&}; //@extend .block__element--modifer; になってしまう
      color: #f00;
    }
  }
}
そこで親の親の部分で、 &を変数に格納しておけば、そのあと引き継ぐことができる。
.block{
  display: block;
  &__element{
    display: inline-block;
    $element: #{&};
    &--modifier{
      @extend #{$element};
      color: #f00;
    }
  }
}
これをコンパイルすると以下のようになる。
.block{display:block}
.block__element,.block__element--modifier{display:inline-block}
.block__element--modifier{color:red}
これを応用する場面ですが、例えば @for で回してグリッドを作るとしたら、 コード量が少なく済む。
以下はdisplay: table; 前提のグリッドを任意の block の中で作る mixin のサンプルです。
($parent という命名はいかがなものかと思うが…)
@mixin grids($cols: 12){
  $width: 100/$cols;
  @for $i from 1 through $cols {
    &__#{$i}{
      $parent: #{&};
      box-sizing: border-box;
      display: table-cell;
      padding: 0 5px;
      width: $width*$i+0%;
      &:first-child{
        padding-left: 0;
      }
      &:last-child{
        padding-right: 0;
      }
      &--top{
        @extend #{$parent};
        vertical-align: top;
      }
      &--middle{
        @extend #{$parent};
        vertical-align: middle;
      }
      &--bottom{
        @extend #{$parent};
        vertical-align: bottom;
      }
    }
  }
}
これを .grid という block の中で使うとして、コンパイル後
.grid__1,.grid__1--bottom,.grid__1--middle,.grid__1--top{box-sizing:border-box;display:table-cell;padding:0 5px;width:8.33333%}
.grid__1--bottom:first-child,.grid__1--middle:first-child,.grid__1--top:first-child,.grid__1:first-child{padding-left:0}
.grid__1--bottom:last-child,.grid__1--middle:last-child,.grid__1--top:last-child,.grid__1:last-child{padding-right:0}
.grid__1--top{vertic.align:top}
.grid__1--middle{vertic.align:middle}
.grid__1--bottom{vertic.align:bottom}
.grid__2,.grid__2--bottom,.grid__2--middle,.grid__2--top{box-sizing:border-box;display:table-cell;padding:0 5px;width:16.66667%}
.grid__2--bottom:first-child,.grid__2--middle:first-child,.grid__2--top:first-child,.grid__2:first-child{padding-left:0}
.grid__2--bottom:last-child,.grid__2--middle:last-child,.grid__2--top:last-child,.grid__2:last-child{padding-right:0}
.grid__2--top{vertic.align:top}
.grid__2--middle{vertic.align:middle}
.grid__2--bottom{vertic.align:bottom}
.grid__3,.grid__3--bottom,.grid__3--middle,.grid__3--top{box-sizing:border-box;display:table-cell;padding:0 5px;width:25%}
.grid__3--bottom:first-child,.grid__3--middle:first-child,.grid__3--top:first-child,.grid__3:first-child{padding-left:0}
.grid__3--bottom:last-child,.grid__3--middle:last-child,.grid__3--top:last-child,.grid__3:last-child{padding-right:0}
.grid__3--top{vertic.align:top}
.grid__3--middle{vertic.align:middle}
.grid__3--bottom{vertic.align:bottom}
.grid__4,.grid__4--bottom,.grid__4--middle,.grid__4--top{box-sizing:border-box;display:table-cell;padding:0 5px;width:33.33333%}
.grid__4--bottom:first-child,.grid__4--middle:first-child,.grid__4--top:first-child,.grid__4:first-child{padding-left:0}
.grid__4--bottom:last-child,.grid__4--middle:last-child,.grid__4--top:last-child,.grid__4:last-child{padding-right:0}
.grid__4--top{vertic.align:top}
.grid__4--middle{vertic.align:middle}
.grid__4--bottom{vertic.align:bottom}
.grid__5,.grid__5--bottom,.grid__5--middle,.grid__5--top{box-sizing:border-box;display:table-cell;padding:0 5px;width:41.66667%}
.grid__5--bottom:first-child,.grid__5--middle:first-child,.grid__5--top:first-child,.grid__5:first-child{padding-left:0}
.grid__5--bottom:last-child,.grid__5--middle:last-child,.grid__5--top:last-child,.grid__5:last-child{padding-right:0}
.grid__5--top{vertic.align:top}
.grid__5--middle{vertic.align:middle}
.grid__5--bottom{vertic.align:bottom}
.grid__6,.grid__6--bottom,.grid__6--middle,.grid__6--top{box-sizing:border-box;display:table-cell;padding:0 5px;width:50%}
.grid__6--bottom:first-child,.grid__6--middle:first-child,.grid__6--top:first-child,.grid__6:first-child{padding-left:0}
.grid__6--bottom:last-child,.grid__6--middle:last-child,.grid__6--top:last-child,.grid__6:last-child{padding-right:0}
.grid__6--top{vertic.align:top}
.grid__6--middle{vertic.align:middle}
.grid__6--bottom{vertic.align:bottom}
.grid__7,.grid__7--bottom,.grid__7--middle,.grid__7--top{box-sizing:border-box;display:table-cell;padding:0 5px;width:58.33333%}
.grid__7--bottom:first-child,.grid__7--middle:first-child,.grid__7--top:first-child,.grid__7:first-child{padding-left:0}
.grid__7--bottom:last-child,.grid__7--middle:last-child,.grid__7--top:last-child,.grid__7:last-child{padding-right:0}
.grid__7--top{vertic.align:top}
.grid__7--middle{vertic.align:middle}
.grid__7--bottom{vertic.align:bottom}
.grid__8,.grid__8--bottom,.grid__8--middle,.grid__8--top{box-sizing:border-box;display:table-cell;padding:0 5px;width:66.66667%}
.grid__8--bottom:first-child,.grid__8--middle:first-child,.grid__8--top:first-child,.grid__8:first-child{padding-left:0}
.grid__8--bottom:last-child,.grid__8--middle:last-child,.grid__8--top:last-child,.grid__8:last-child{padding-right:0}
.grid__8--top{vertic.align:top}
.grid__8--middle{vertic.align:middle}
.grid__8--bottom{vertic.align:bottom}
.grid__9,.grid__9--bottom,.grid__9--middle,.grid__9--top{box-sizing:border-box;display:table-cell;padding:0 5px;width:75%}
.grid__9--bottom:first-child,.grid__9--middle:first-child,.grid__9--top:first-child,.grid__9:first-child{padding-left:0}
.grid__9--bottom:last-child,.grid__9--middle:last-child,.grid__9--top:last-child,.grid__9:last-child{padding-right:0}
.grid__9--top{vertic.align:top}
.grid__9--middle{vertic.align:middle}
.grid__9--bottom{vertic.align:bottom}
.grid__10,.grid__10--bottom,.grid__10--middle,.grid__10--top{box-sizing:border-box;display:table-cell;padding:0 5px;width:83.33333%}
.grid__10--bottom:first-child,.grid__10--middle:first-child,.grid__10--top:first-child,.grid__10:first-child{padding-left:0}
.grid__10--bottom:last-child,.grid__10--middle:last-child,.grid__10--top:last-child,.grid__10:last-child{padding-right:0}
.grid__10--top{vertic.align:top}
.grid__10--middle{vertic.align:middle}
.grid__10--bottom{vertic.align:bottom}
.grid__11,.grid__11--bottom,.grid__11--middle,.grid__11--top{box-sizing:border-box;display:table-cell;padding:0 5px;width:91.66667%}
.grid__11--bottom:first-child,.grid__11--middle:first-child,.grid__11--top:first-child,.grid__11:first-child{padding-left:0}
.grid__11--bottom:last-child,.grid__11--middle:last-child,.grid__11--top:last-child,.grid__11:last-child{padding-right:0}
.grid__11--top{vertic.align:top}
.grid__11--middle{vertic.align:middle}
.grid__11--bottom{vertic.align:bottom}
.grid__12,.grid__12--bottom,.grid__12--middle,.grid__12--top{box-sizing:border-box;display:table-cell;padding:0 5px;width:100%}
.grid__12--bottom:first-child,.grid__12--middle:first-child,.grid__12--top:first-child,.grid__12:first-child{padding-left:0}
.grid__12--bottom:last-child,.grid__12--middle:last-child,.grid__12--top:last-child,.grid__12:last-child{padding-right:0}
.grid__12--top{vertic.align:top}
.grid__12--middle{vertic.align:middle}
.grid__12--bottom{vertic.align:bottom}
まあ flexbox を使えるなら、こんなグリッド今時作ることないと思いますけどね!!!!!!
例はともかく、親の親を参照するのに変数に格納しておけば、万が一セレクタ名をタイポしてたとか変更しなきゃいけないときもエラーがでなくてラクチンなのでいいことです。
jQuery なしでスムーススクロール実装するときのベストプラクティスがわからない
jQuery で便利なのは offset 系の処理だと思うんだけど、 offset 系の処理で最も頻発するのはスムーススクロールだと思ってる。 とりあえず何秒かごとにターゲットの場所までちょっとずつスクロールしていくだけという雑なコードを書いているんですがうまいやり方を知りたい。スムースにすればするほど重くなってしまう。はやく scroll-behavior が全てのブラウザに搭載されてほしい
雑な上に親なき野良エンジニアなのでベストプラクティスがわかりません。 以下に雑コードを掲載しますのでこうしろとかこういう本を読めとかあったら教えて下さい 間違ってもコピペして使ったりしないでくださいネ…。
var insiteLink = document.getElementsByClassName('insiteLink');
for(var i=0;i<insiteLink.length;i++){
  insiteLink[i].addEventListener('click', function(e){
    e.preventDefault();
    var duration = 400; //何秒かけてスクロールするか
    var frame = 10; //何秒に1度スクロールするか、多いほどカクカクする
    var speed = 0; //速さです
    var href = this.getAttribute('href');
    var target = (href==='#' || href==='' ? 'html' : href.replace('#', ''));
    var targetObj = target==='html' ? document.documentElement : document.getElementById(target);
    var targetRect = targetObj.getBoundingClientRect();
    var scrollTop = window.pageYOffset || document.documentElement.scrollTop;
    var targetTop = targetRect.top + scrollTop;
    var distance = scrollTop - targetTop;
    speed = distance/duration*frame;
    smoothScroll = window.setInterval(function(){
      scrollTop = scrollTop-speed;
      window.scrollTo(0,scrollTop);
    }, frame);
    window.setTimeout(function(){
      clearInterval(smoothScroll);
    }, duration+1);
  });
}
gulp+ejs+json その2
ページの情報を json にまとめておいて、そこから情報を取ってきたり、出力場所をそれぞれのページで変えたりする場合、以下のようなやり方でできる。
meta の一部が違うとか、中身で共通する部分はあるけどそれぞれのページでユニークな部分が多いときに便利。
ただし、jsonData[i].name.html という名前のファイルを予め作っておく必要あり。
おおまかな手順説明
- テンプレートになる
jsonData[i].name.htmlを作成 - ページ内情報を記述しておく
package.jsonを作成 - gulp で ejs テンプレートエンジンで
jsonData[i].name.htmlに package.json の内容を挿入して出力するタスクをページ分作って走らせる
index.html
<!DOCTYPE html>
<html lang="ja">
<head>
  <meta charset="UTF-8">
  <title><%= pageData.title %></title>
  <meta name="viewport" content="width=device-width, initial-scale=1, user-scalable=no">
  <meta name="keywords" content="<%= pageData.keywords %>" />
  <meta name="description" content="<%= pageData.description %>" />
  <link rel="stylesheet" href="/css/styles.css">
</head>
<body>
  <h1><%= pageData.title %></h1>
  <p>ページの内容です。</p>
</body>
</html>
pages.json
[
  {
    "url": "hoge/index.html",
    "name": "index",
    "title": "愉快なホームページです",
    "keywords": "愉快,最高,便利",
    "description": "このホームページには愉快なことがたくさん書いてあります。"
  },
...
]
gulpfile.js
var gulp = require('gulp');
var gulp = require('gulp');
var $ = require('gulp-load-plugins')({
  pattern: ['gulp-*', 'gulp.*'],
  replaceString: /\bgulp[\-.]/
});
var jsonData = require('./_src/templates/pages.json');

var buildSet = [];
jsonData.forEach(function(page, i){
  gulp.task(page.name, function(){
    gulp.src('./_src/templates/'+page.name+'.html')
    .pipe($.plumber())
    .pipe($.ejs({
      pageData: page,
    }))
    .pipe($.rename(page.url))
    .pipe(gulp.dest('./'));
  });
  buildSet.push(page.name);
});

gulp.task('default', ['serve'], function(){
  gulp.watch('./_src/templates/**/*', buildSet);
});
index.html とか pages.json は特に何の変哲もないサンプルなのでここではおいといて。キモは gulpfile.js でのタスクの作り方。
まず、 var buildSet=[]; でビルドタスクをまとめるための配列を作成。
この中に、forEach で pages.json にある分だけタスクを作成する。
タスク名は jsonData[i].name から取ってくるのと、gulp.src() からは同名のテンプレートを参照。(gulp-ejs が ver 2 になってから、 何が何でも.html で吐き出す仕様じゃなくなり、元の拡張子が引き継がれるようになったので、+.html です)
それぞれのタスク内で pageData に 配列の要素を入れる。
gulp-rename で jsonData[i].url にファイル名をリネームして出力。
配列 buildSet にタスク名を追加。
タスクのウォッチは buildSet をタスク対象にしてあげればOK(ただしファイルがたくさんあると全部のビルドがそれぞれ走るのでログが大変よく流れる)
こんなかんじでしょうか!中身がユニークすぎなければ、(値を流し込むだけでいけそうなら)いちいち jsonData[i].name という名前のテンプレートを作らなくても自動生成できるが(ネット上にはそのような情報がたくさんありますね)
今回2ヶ月ぶりの更新と、貧弱なメモブログだけど、1日30~50くらいアクセスがある。 なんかみんな gulp+browserify の記事を見に来てるみたい。みんな browserify 好きだね。
近況ですが、 IE8 を切って jQuery を使わなくてもよくなってきたので、以前より js 書くのが楽しくなってきた。 昨年は IE8 対応で今使ってない tips をかなり身につけてしまったのでよくなかった。週五の仕事に疲れて技術書もほとんど読めてない(まともに読んだのパーフェクト PHP くらいかもしれない) 今年は今後も役立つ技術を中心に学んでいきたい。まずは新しい技術を使っていける環境に身を置きたい。 紹介とか紹介とか紹介とか興味がありまくりなので tttttahiti[at]gmail までお願いします。ポートフォリオの url を送ったりします。 ポートフォリオが見たいだけの野次でも大歓迎です。何卒宜しくお願い致します。
git で画像扱う時の設定
git で画像も管理してて、多数の人(多数の環境)の間で編集しあってると、
編集してない画像ファイルが modifiy 済みみたいな挙動をして、git reset --hard しても元に戻らないみたいなことがある。
さくっと!
.gitattributes
# Autodetect text files
* text=auto

# Force the following filetypes to have unix eols, so Windows does not break them
*.* text eol=lf

# Denote all files that are truly binary and should not be modified
*.png binary
*.jpg binary
テキストファイルは 全部 lf 改行
binary ファイルは git にわかるように指定してあげて謎編集を防ぐ
的な?
小一時間費やしてしまった…
MySQL の now() とタイムゾーンの関係
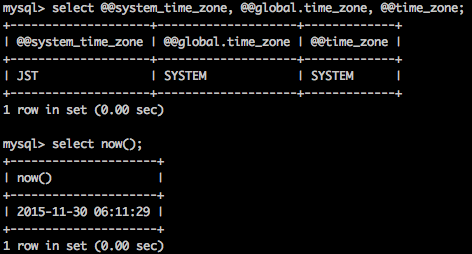
NOW() した際に UTC になっていたので、JST にしようとしたところはまった。
mysql> SELECT @@system_time_zone, @@global.time_zone, @@session.time_zone;
をするとわかります。
@@system_time_zone はシステムタイムゾーンと言われるもので、ホストマシンのタイムゾーンを特定して、これを使用してシステム変数で設定しようとする。mysqld を起動した後は変更しない。起動時に明示的に設定することができる。
@@global.time_zone はサーバの現在のタイムゾーンで、サーバが現在動作しているタイムゾーンを示す。初期値は'SYSTEM'で、サーバのタイムゾーンがシステムタイムゾーンと同じことを表す。
@@session.time_zone は接続ごとのタイムゾーン。接続するそれぞれのクライアントごとに設定される。最初はglobal.time_zoneから値を取ってくるけど、後で変えられる。
(引用&参考-MySQL :: MySQL 5.6 リファレンスマニュアル :: 10.6 MySQL Server でのタイムゾーンのサポート)
NOW() がとってくるタイムゾーンは @@session.time_zone っぽいんですが、システムタイムゾーンが JST で、他が SYSTEM の値を取っていれば、全部JSTになるっしょと思ってたらそうじゃないみたい。このあたり、よくわかってない…

SYSTEM はシステムタイムゾーンと同じ値を取ると思っていたんですがそうじゃない?あるいは、このシステムタイムゾーンの JST が効いていない?
でも、 /etc/localtime は Asia/Tokyo にしてあるので、ホストマシンは JST と同じ時刻設定になってて、
$ date
するとちゃんと JST の時刻で表示されてる && my.cnf にも timezone=JST になってるので、効いてないということはないと思っているんですが…よくわかってない…
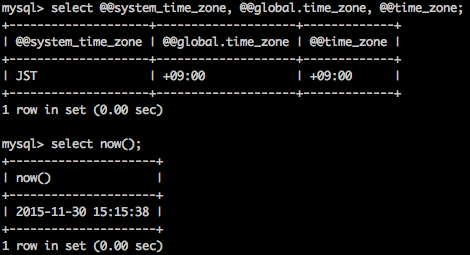
とりあえず、日本はサマータイムとかもないし、 UTC からぴったり9時間前ということには変わりないので、my.cnf で default-time-zone を+9時間で設定しておく。
[mysql]
~略~
default-time-zone='+9:00'

一応、 JST で NOW() できたので、今日はこんなかんじで…
タイムゾーン難しいし、世の中の時計全部 UTC だったらいいのでは?(乱暴)
PHP5.6に入れなおすぞ!
前回うまくいかなかった vagrant 上の PHP のアップグレード作業に再チャレンジしました。
結果!

そして!

できた〜!!!
手順!
準備。古い php は消しておく
yum remove php-*
remi リポジトリの追加
まずそもそも(前回から) remi ってなんやねん…って思っていたんですが、どうやら yum のパッケージインストール、アップデート、アンインストールを便利にしてくれるリポジトリらしい。
新しいバージョンのパッケージがダウンロード出来るようになったりする拡張みたいな?イマイチよくわかってないけど、インストール元が増えて便利っぽい。
早速追加してみましょう。の前に! remi をインストールする前に epel というリポジトリも入れなきゃいけないらしい。この epel というのも remi みたいにインストール元が増える便利リポジトリっぽい。全くよくわかってないことが顕著になってきた。すいません。後でもうちょっと調べます
とりあえず epel をダウンロードするぞ!
まずは epel の GPG-key という公開鍵的なものを /etc/pki/rpm-gpg/ にダウンロードする。
epel の GPG-key は riken のサイト内にあるらしい。
cd /etc/pki/rpm-gpg/
wget http://ftp.riken.jp/Linux/fedora/epel/RPM-GPG-KEY-EPEL-6
入手出来たか!?出来たら /etc/yum.repos.d/ に epel.repo という EPEL 用の repo ファイルを作る。
ファイルの中身はこんなかんじです
#Extra Packages for Enterprise Linux (EPEL)
[epel]
name=Extra Packages for Enterprise Linux (EPEL)
baseurl=http://ftp.riken.jp/Linux/fedora/epel/6/$basearch/
enabled=0
gpgcheck=1
gpgkey=file:///etc/pki/rpm-gpg/RPM-GPG-KEY-EPEL-6
baseurl の $basearch というのは、epel を使うときにここにダウンロードしに行くところが自動で入るらしい。頭いい。(雑な感想)
enabled=0 は yum の実行時にデフォルトでは無効になり、指定しないと epel を使わないということです。
gpgcheck=1 はGPGを使用してパッケージの署名を確認するという意味。
gpgkey はさっきダウンロードした鍵の場所を指定している!
このファイルができたら、もう yum 使うときに epel も使えるぞ!
使い方はこんな感じです!
yum --enable=epel update
今回私の場合は特にエラーも出ずいい感じに epel が使えてるみたいな挙動をしていたので、やっと、 remi をインストールします。
wget http://rpms.famillecollet.com/enterprise/remi-release-6.rpm
rpm -ivh remi-release-6.rpm
ここでエラーが出る。
警告: remi-release-6.rpm: ヘッダ V3 DSA/SHA1 Signature, key ID 00f97f56: NOKEY
エラー: 依存性の欠如:
	epel-release >= 6 は remi-release-6.6-1.el6.remi.noarch に必要とされています
epel-release が足りないらしいのでインストールしましょう。
yum --enablerepo=epel install epel-release
そしてもう一度、先ほどの rpm のコマンドを試してみると、うまくいくはず!
やっと、 remi リポジトリのインストールができました。
remi でインストール出来るリストのファイルみたいなのが /etc/yum.repos.d/remi.repo に出来ます。
この中を見ると、 remi-php55(PHP5.5), や remi-php56(PHP5.6) などがありますので、これをインストールします。
先ほどの epel を有効にしたのと同じように、 remi もデフォルトでは無効なので有効にするオプションを付けます。
yum install --enablerepo=remi-php56 php
あとは vagrant reload して PHP バージョン確認!ページの表示もちゃんと確認!よかった。
参考
ejs で json からデータを取り込む
ejs は embeddedjavascript というテンプレートエンジン。
gulp 用のパッケージもあるよ。
HTML に組み込むような書き方なので、デザイナーさんなどと共有しやすいし、学習コストが低くて気に入っています。
外部ファイルの include や 変数の呼び出し、ループなど、はもちろん js で出来ることは(たぶん)全部出来る。
以下、外部ファイルの head を読み込んで、見出しに変数を入れ、配列をループさせる簡単な例です。
<% var title = "見出し1", array=["hoge","fuga","poyo"] %>
<html>
<head>
  <% include head %>
</head>
<body>
  <h1><%= title %></h1>
  <ul>
    <% for(var i=0;i<array.length;i++){ %>
    <li><%= array[i] %></li>
    <% } %>
  </ul>
</body>
</html>
出力はこんなかんじ
<html>
<head>
  <meta charset="UTF-8">
  <meta name="description" content="ejs のサンプルです。" />
  <link rel="stylesheet" type="text/css" media="all" href="style.css" />
<title>サンプル</title>
</head>
<body>
  <h1>見出し1</h1>
  <ul>

    <li>hoge</li>

    <li>fuga</li>

    <li>poyo</li>

  </ul>
</body>
</html>
include とか出来るだけでも十分っていう場合もあるけど、せっかくなんでデータを取り込んでループさせたりとかしたいですね。
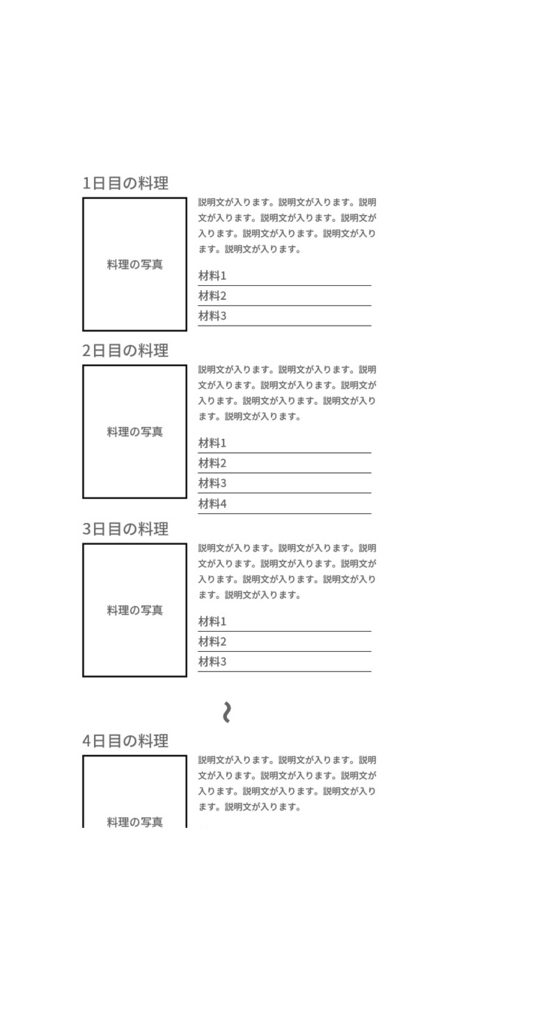
今回私は一週間分の違う料理とその材料を記載したデータを作りましたので、それを gulp + ejs + json でテンプレートに取り込むということをしました。

こんなかんじのイメージです。
ポイントとしては、料理の写真、説明文、材料がユニークな値になり、材料の数も可変ということです。
用意するのは
- gulp
- template.ejs
- data.json
説明を容易にするため、各種ファイルは全て gulp の作業ディレクトリ上にあるということで。
gulpfile.js はこんなかんじ。
var gulp = require('gulp');
var ejs = require('gulp-ejs');
var jsonData = require('./data.json');

gulp.task('build', function(){
  return gulp.src('./templates.ejs')
  .pipe(ejs({
    jsonData: jsonData //jsonData に data.json を取り込む
  }))
  .pipe(gulp.dest('./'));
});
シンプル!json で作ったデータはこんなかんじ。
[
  {
    "daynum": "1",
    "dishname": "おいしいカレー",
    "description": "みんな好きなカレーです。甘口です。",
    "item": [
      {
        "name": "にんじん",
        "amount": "中3本",
      },
      {
        "name": "たまねぎ",
        "amount": "中2玉",
      },
      {
        "name": "じゃがいも",
        "amount": "中3個",
      },
      {
        "name": "カレールー",
        "amount": "4切れ",
      }
    ]
  },
  {
    ...
  },
  {
    "daynum": "7",
    ...
  }
]
excel データを渡されたりなどした場合、これとかで変換するとラクチンです。
次、 template.ejsはこんなかんじ。
<%
var data = jsonData;
%>
<html>
<head>
  <meta charset="UTF-8">
  <link rel="stylesheet" type="text/css" media="all" href="./styles.css" />
  <title>一週間の料理</title>
</head>
<body>
<h1>一週間の料理</h1>
<% data.forEach(function(day){ %>
<section class="dish">
  <h2 class="dish__heading"><%= day.daynum %>日目の料理</h2>
  <div class="dish__image">
    <img src="./img/day<%= day.daynum %>.jpg" alt="<%= day.dishname %>">
  </div>
  <div class="dish__body">
    <p class="dish__name"><%= day.dishname %></p>
    <p class="dish__description"><%= day.description %></p>
    <ul class="ingredients">
      <% day.item.forEach(function(item){ %>
      <li class="ingredients__item">
        <p class="ingredients__name"><%= item.name %></p>
        <p class="ingredients__amount"><%= item.amount %></p>
      </li>
      <% }) %>
    </ul>
  </div>
</section>
<% }) %>
</body>
</html>
ポイントは、 forEach 文で各配列 or オブジェクトを操作する形にするっていうところです。
for(var i=0;data.length;i++){
...
}
のような記法だと、なぜだか data[i].description などが読み込めません…!
出力すると以下のようになるはずです。
<html>
<head>
  <meta charset="UTF-8">
  <link rel="stylesheet" type="text/css" media="all" href="./styles.css" />
  <title>一週間の料理</title>
</head>
<body>
<h1>一週間の料理</h1>

<section class="dish">
  <h2 class="dish__heading">1日目の料理</h2>
  <div class="dish__image">
    <img src="./img/day1.jpg" alt="おいしいカレー">
  </div>
  <div class="dish__body">
    <p class="dish__name">おいしいカレー</p>
    <p class="dish__description">みんな好きなカレーです。甘口です。</p>
    <ul class="ingredients">

      <li class="ingredients__item">
        <p class="ingredients__name">にんじん</p>
        <p class="ingredients__amount">中3本</p>
      </li>

      <li class="ingredients__item">
        <p class="ingredients__name">たまねぎ</p>
        <p class="ingredients__amount">中2玉</p>
      </li>

      <li class="ingredients__item">
        <p class="ingredients__name">じゃがいも</p>
        <p class="ingredients__amount">中3個</p>
      </li>

      <li class="ingredients__item">
        <p class="ingredients__name">カレールー</p>
        <p class="ingredients__amount">4切れ</p>
      </li>

    </ul>
  </div>
</section>

<section class="dish">
  <h2 class="dish__heading">2日目の料理</h2>
  ...


</body>
</html>
参考記事